Friday, July 27, 2007

Kitchen rehab

The kitchen was the room that had the most work done, and the most money spent. It's a small kitchen, a little less than 100 sf. It was in total shambles when we first saw it:

We were better able to really see potential once the junk had been cleared out:


There really wasn't anything salvageable in this kitchen. We changed the layout a bit, the refrigerator was located in the back hallway, and we decided to give up some counter space to get the fridge into the same room. There is also a nice pantry, which someone had installed a toilet in.


So - everything was ripped out, from the floor to the ceiling:


After that, we had some new electric put in for a hood and a new outlet. Then plumbing put in for a dishwasher. The hookups we originally thought were for a dishwasher turned out to be plumbing for a washer. We also added more cabinets above the stove, so even though we took out some lower cabinets and counter space for the fridge, we ended up putting in more storage than was originally there.


Wednesday, July 25, 2007

Hallway work

The hallway turned out quite nice. There was a runner carpet along the floor, when we pulled that up, you could see water damage on the hardwoods from the bathroom. They actually came out okay after refinishing, but I decided to put another runner down, and that turned out to be a very nice touch.


The hallway required wallpaper stripping, ceiling and wall patching, new light fixture and paint.

Monday, July 23, 2007

Rehabbed bedrooms

This house has 3 bedrooms. First views were not bad, although the rooms had junk in them.


They ended up being a little more work than I thought. There was wallpaper, which I thought would just come down and I would patch and paint. Not so - there were multiple layers of wallpaper, very old - down to the original wallboard.
I soon realized that this would not be possible to remove, so I skim coated the walls with joint compound and then painted.


The floors upstairs are red pine. The varnish had darkened to the point that I thought the floors were actually stained, but turns out they weren't.


Rooms finished. They were all done in the same color scheme: Magnolia Spray on the walls with white trim.


Friday, July 20, 2007

Bathroom rehab

Already have 2 showings scheduled for the house! Then an open house on Sunday. Here's hoping the market isn't going to be soft for me.

The bathroom rehab was the scariest part for me, because it involved doing things I hadn't done before, such as toilet replacement and the tub.
This bathroom was just gross. Filthy, moldy and outdated. The toilet leaked, and you could see water stains on the kitchen ceiling below. The shower surround had small round holes in it, not sure how those were created, probably with a screw driver.


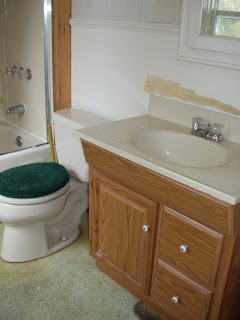
After inspecting the tub, we decided that other than the finish, it was in good shape, so rather than removing a cast iron tub - we wanted to refinish it. After deciding that, everything else was removed from the bathroom except for the medicine cabinet (which was original). Like every other surface in this house, there was wallpaper everywhere, including behind the shower surround!

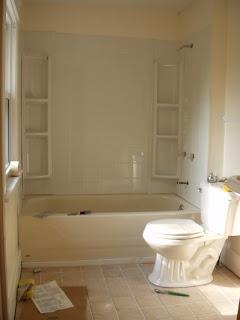
After repairing the floor, I put down backer board and then tiled.


Then the toilet and sink were installed, then the surround. The tub refinisher said to have the tub done last, so everything went in but the caulk and fixtures.


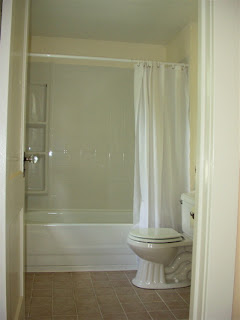
After that, the tub was done. It originally was almond, and the refinisher was able to make it white. They can actually make it almost any color, which I have filed away for future reference.
Then came the light fixture and shower curtain.
Finished bath (the colors are a bit yellow due to the sunlight):


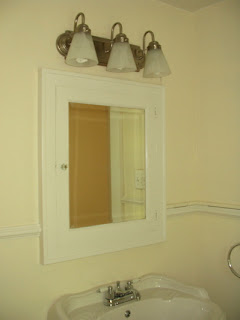
I really like how this turned out. The pedestal sink makes the bathroom appear much larger. I would have liked tile for the tub surround, but we had to make room in the budget for the overage on the roof. Turned out quite nice, and was quick and easy to install. It was a mid-range surround.

Thursday, July 19, 2007

Dining room rehab

The dining room was more difficult than the bedrooms and living room to rehab, because of the ceramic tile floor that was in place.
First impression of the dining room:

After closing (bank cleared it out)

We didn't know about the wood floors underneath the tile, and the first thought was to design a color scheme around the existing tile. The problem was that the tile was ugly, even though it was in good condition. Looked cheap and was pink


So, I thought it would be better to remove it and put down new tile. However, once some tile was lifted, we saw these great floors.

Lifting the tile itself was quite the job. At first, I tried prying up tiles, but they were breaking off in tiny pieces, which would have taken weeks to do. So I used a crow bar underneath the underlayment and lifted up big chunks. It took about 2/3 of a day to get all the floor up. That day was the most physically tired I got during the whole rehab.
Then it was just a matter of wall patch, paint, new light fixtures and floor finishing:


Tuesday, July 17, 2007

House going on the market.

Tying up some loose ends, and the house will be on the market officially on Thursday. Over the next few days, I will post pictures of the individual rooms from start to finish.

Starting with the living room! Out of all the rooms, this was the one that was least problematic. Other than the general filth, it was in good condition.


First thing to go was the rug. It reeked of pet urine, and I was actually surprised that there were only a couple stains on the wood floors. When we first looked at the house, we did not know about the hardwoods underneath, so that was a pleasant surprise.
Then down came all the wallpaper and priming the walls, which actually did a lot to improve the room. The wallpaper was really dirty ( not to mention totally outdated).


The walls, trim and ceiling were painted, outlets were switched out, new light fixture and new blinds.
Finished room.